Managing E-Mail Properties for Public Folders
Public folders
created natively in Exchange Server 2003 using Exchange System Manager
are not mail-enabled by default. This differs from folders that have
been migrated from Exchange Server 5.5, which are all mail-enabled
during the migration. Therefore, after creating a public folder in
Exchange Server 2003, you must mail-enable the folder if you want it to
be able to receive e-mail. Mail-enabling a public folder is done through
Exchange System Manager.
In Exchange System Manager, navigate to the public folder you want to mail-enable.
Right-click the folder, point to All Tasks, and then click Mail Enable.
Mail-enabling a
public folder by default creates e-mail addresses for X.400 and SMTP.
You can view these e-mail addresses or add additional addresses, if
necessary. If you right-click the public folder that you mail-enabled
and click Properties, you will see that there are additional tabs, as
follows:
E-Mail Addresses
Exchange General
Exchange Advanced
Member Of
E-Mail Addresses Tab
On the E-Mail Addresses tab, you view and create e-mail addresses to be associated with the public folder.
Click the E-Mail Addresses tab.
Click New, and then select SMTP Address from the list of e-mail address types. Click OK.
Type an e-mail address for the folder and click OK.
View the new address on the E-Mail Addresses tab, shown in Figure 1.
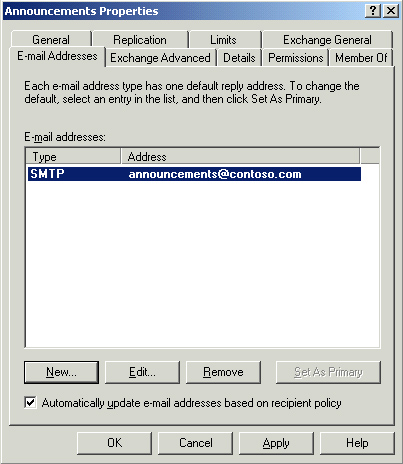
You can configure alternate e-mail addresses, as well, though there can be only a single primary address.
Exchange General Tab
On the Exchange
General tab, you configure properties for the public folder that are
similar to what you would configure for a user mailbox. When you click
the Exchange General tab, you first see the public folder tree that the
folder belongs to, as well as the alias for the folder. Generally, the
alias is the same as the folder name, though you can choose to make it
different, which is useful if the folder name is long.
Unless
there is a compelling reason to have an alias different from the e-mail
address, you should leave it the same. The following is a real-world
scenario that illustrates this policy. The company Fabrikam, Inc. has had the address fabrikam.com for about a year; prior to that, its address was contoso.com. Whenever the administrator set up a new user, his SMTP address always defaulted to @contoso.com, and the administrator would have to change the SMTP address manually to @fabrikam.com.
The administrator found the global Recipient Policy setting for
defining e-mail addresses and changed the SMTP address policy from contoso.com to fabrikam.com. When
Exchange Server updated everyone’s e-mail addresses based on the new
policy, it used the Alias field to regenerate SMTP addresses.
Approximately 20 percent of mailboxes, distribution lists, and public
folders had matching aliases and SMTP addresses (for example, an
employee named Jenny Lysaker had both her SMTP address and alias as Jenny)
and were unaffected by the update. However, approximately 80 percent
had different aliases and SMTP addresses (for example, an employee named
Bob Gage had an alias of BobG and an SMTP address of Bob).
In these cases, Exchange overwrote the existing SMTP address with the
new one and drew from the Alias field to create the new one. As a
result, most employees, distribution lists, and public folders were
unavailable to users outside of the organization because their addresses
were no longer correct. Faced with the prospect of restoring from
backup or manually editing each SMTP address and correcting it (about
750 addresses total), the company chose the latter. The
restoration would be a tedious process, and one that could be avoided
by having the aliases match the SMTP address. The administrator caused
the problem by having Exchange update all existing addresses, but the
inconsistency in naming aliases and e-mail addresses contributed to the
seriousness of the problem. |
|
Figure 2
shows the Delivery Restrictions dialog box that opens when you click
the Delivery Restrictions button on the Exchange General tab.
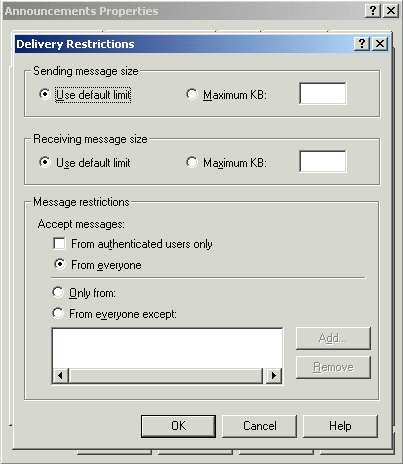
The delivery
restrictions are similar to what you would configure for a user mailbox.
If you have folders both send and receive e-mail, you can set limits on
the size of the messages. Under Message Restrictions, you have the
option of limiting who can send e-mails to the folder. This is useful
when you have a folder being used by an application or by a limited
group of users and you want to prevent others from sending messages to
it. You can also prevent only specific users from sending to the folder.
On the Exchange General
tab, click Delivery Options to configure Send On Behalf permissions for
the folder and to configure forwarding addresses. If you are using a
public folder to support a customer base, such as for receiving feedback
e-mail, you might want to allow employees to reply to a customer as the
address associated with the folder (such as [email protected])
rather than using their personal address. You would use a forwarding
address if you wanted an additional e-mail address to receive the
messages, as well. For example, you might want the main support person
for a customer forum to receive the e-mails in their own mailbox in
addition to having the messages reside in the public folder.
Exchange Advanced Tab
When you click the Exchange Advanced tab, the options shown in Figure 3 are available.
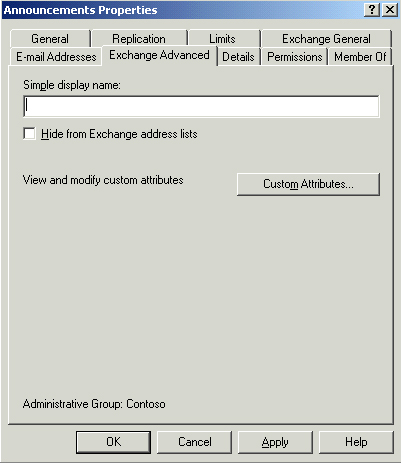
The first setting
you can configure is the Simple Display Name, which controls how the
folder appears in address lists. If you have a public folder name that
is complex or contains non-ANSI characters, you can specify a Simple
Display Name that will appear instead in your address lists.
Often,
public folders are created for a specific application or purpose and
are not intended to be used by users in the organization. It is useful
to hide these folders from address lists so users do not even see them.
The Hide From Exchange Address Lists option controls whether these
folders are visible in address lists. A hidden folder still functions
and can receive messages, but it is not visible when browsing the list
of recipients in the Global Address List (GAL).
There is also the
option of defining custom attributes for public folders. When
configuring recipient objects (typically user mailboxes), Exchange
Server 2003 provides fields for defining a number of attributes for the
recipient, such as department, title, phone extension, and so on. The
list of attributes is not exhaustive, so Exchange Server 2003 allows you
to define custom attributes. With public folders, by default you don’t
have the option of defining many of the common attributes, but you can
click Custom Attributes on the Exchange Advanced tab and define
additional attributes for the folder, as required.
Finally, the Exchange Advanced tab informs you of the administrative group in which the public folder resides.
Member Of Tab
The Member Of tab is used
to add the public folder to Active Directory groups so that you can make
the public folder part of a distribution list. When a public folder
belongs to a security or distribution group, it receives all messages
sent to the e-mail address associated with the group. The Member Of tab
is shown in Figure 4.
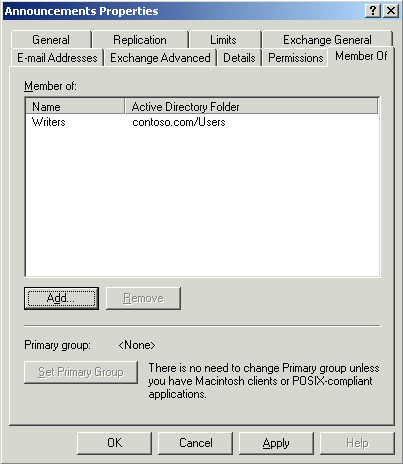
Since you cannot log on as a
folder, putting a public folder in a security group does not allow it
to authenticate for accessing any resources. However, security groups
can be mail-enabled like distribution groups, so it may be useful to add
a public folder to a security group for e-mail alone.
Setting Storage Limits on Public Folders
Public
folders are largely unlimited in the type of data they can hold. They
are also used to make resources available to users outside of the
organization, such as customers. Therefore, the size of public folders
can grow quickly. Delivery restrictions can help to keep the size of
individual items in the public folder within a defined size, but they do
not prevent the folder from growing in size until it fills the hard
disk. In order to control the size of the public folder itself, you
implement storage limits. The Limits tab of a public folder is shown in Figure 5.
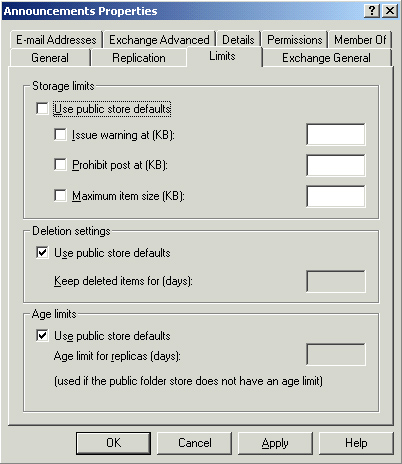
There are three ways to
configure storage limits. You can set storage limits on an entire public
store or on individual public folders. You can also create a public
store policy and apply the policy to as many public stores as necessary.
When you set limits on the public store, all folders in the store
inherit those settings. This allows you to configure settings in one
place and have the settings applied to many folders (as many as you have
in the store).
A public store policy
allows you to configure settings in one place and have the settings
apply to multiple public stores (up to as many as you have created),
which in turn apply to all of the public folders in the public stores.
For large organizations, policies greatly simplify the administration of
public folder storage. When a policy is applied to a public store, the
storage limits cannot be overridden at either the store level or the
individual public folder level. However, if you configure storage limits
on a public store, you can override the limits on an individual public
folder basis. This allows you to make exceptions to the limit settings
configured at the store level.
Age Limits
One important feature
of storage limits for public folders is the ability to set age limits,
which is the amount of time a folder will retain items before
automatically deleting them. This feature is disabled by default, but it
is very commonly used when public folders are used to host Internet
newsgroups, which often generate thousands of messages and gigabytes of
content daily. Setting an age limit on this type of content allows you
to keep public folders from being cost-prohibitive to maintain in terms
of disk space requirements.
Moving Public Folders
Part of the
administration of public folders is maintaining the organization of the
public folder tree. Depending on who has permissions to create folders,
you might find the structure of the tree becoming inefficient and
nonintuitive over the course of time as users work with public folders.
Exchange Server 2003 allows you to move public folders within a tree so
you can maintain a public folder structure that works well for your
organization. You can also copy public folders and paste them into other
folders in the public folder tree.
Tip
Public folders can only be moved within a public folder tree. You cannot move or copy a folder between trees. |
Exchange System Manager is
used to move and copy public folders. The easiest way to move a public
folder is to drag and drop it from one location to the other. You can
also right-click the folder you want to move and click Cut from the
menu, and then right-click the destination folder and click Paste.
Copying a folder follows a similar format. Right-click the folder that
you want to copy and click Copy, and then right-click the destination
folder and click Paste.
Public Folder Replication
In a large organization,
it is usually inefficient and, at times, even costly for remote sites to
access public folders in other sites separated by slower wide area
network (WAN) bandwidth. This is especially true when there are toll
charges for bandwidth usage. Exchange Server 2003 supports replication
of public folders, which places replicas of folders in other public
stores. A replica can be placed in a public store on a server in another
site and the content replicated back and forth on a schedule (such as
after business hours).
Every server in an
organization has a Default public store that is associated with the
Default public store tree. In order to set up replication for public
folders you have created in additional public folder trees, you must
first create a public store on the server that will hold the replica.
When you configure a public store, you associate it with a particular
public folder tree. Even though you associate the store with an existing
tree, this by itself does not enable replication. Once you have a
public store on a destination server, you can configure a public folder
to replicate to the other server.
To replicate a public folder, perform the following steps:
1. | In
Exchange System Manager, navigate to the Folders container and expand
the list of public folder trees. Expand the tree that contains the
folder you want to replicate.
|
2. | Right-click the desired public folder, and then click Properties.
|
3. | Click the Replication tab, shown in Figure 6.
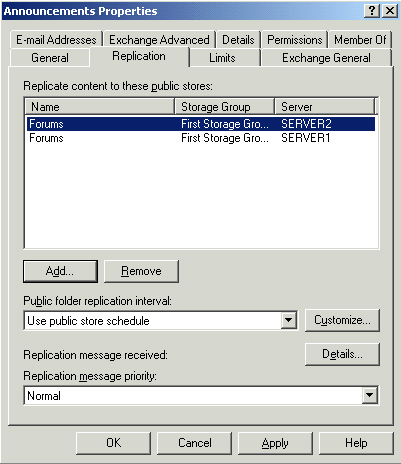
|
4. | Click
Add. This will open a dialog box that lists the servers with an
available public store. Select a public store and click OK.
|
5. | Typically,
there is no need to change the Public Folder Replication Interval,
which is the schedule, or the Replication Message Priority. However, you
can change their configuration here, if necessary. Once done, click OK
to complete the process.
|
Tip
You can also remove a replica using a similar process, in which you choose to remove rather than to add a replica. |
You
might change the replication schedule if you have content that needs to
be replicated more or less often than normal. For example, you might
want a folder that contains important project information to replicate
whenever a change occurs. You could configure that folder to replicate
on a different schedule than the rest of the folders. Likewise, you can
configure a replication schedule at the public store level and have it
apply to all public folders in the store. In addition, you can use a
public store policy to configure replication settings, just as you did
in setting storage limits.
Exchange
Server 2003 uses a multimaster replication model, which means that all
replicas of a public folder are equal and contain the exact same
content. A replica copied from one server to another is a separate
instance of a public folder and its content. There is no master replica,
which means that modifications to any replica are replicated to other
replicas equally.
Depending on the nature of
the public folder, you may not want to replicate a particular public
folder. For example, you may have a public folder that contains critical
customer data that the users in your organization rely on to make
business decisions. To ensure that the information contained in the
public folder is completely up-to-date, you should consider not
replicating that particular public folder.
When considering
replicating a public folder, you should also weigh network traffic
against client traffic. A folder that contains constantly changing
information, such as a newsgroup downloaded from an external site, is
probably not a good candidate for replication because replicating such a
public folder could result in more network traffic than simply allowing
users to access it across the WAN.
Manual Replication
While replication
usually occurs according to the defined schedule, there are times when
you might need to manually initiate replication rather than waiting for
the replication interval to elapse. An example would be when you have
just created a new public folder tree or public folder and want to make
it available to other servers immediately. You can initiate manual
replication on both public folder trees and public folders. To replicate
a public folder tree manually, perform the following steps:
1. | Right-click the public folder tree in Exchange System Manager and click Send Hierarchy. The Send Hierarchy dialog box, shown in Figure 7, opens.
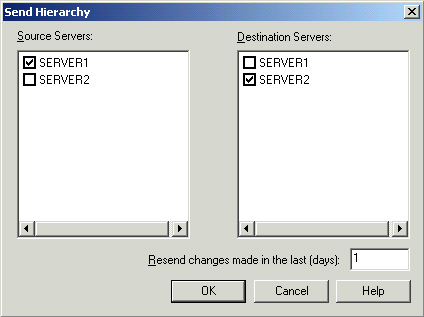
|
2. | Select
the server that you want to replicate from (the source server), and
choose one or more servers that you want to replicate to (destination
servers). You can choose to resend only changes that have been made
since a specified number of days ago.
|
3. | Click
OK, and when Exchange System Manager prompts you that a large amount of
network traffic can be generated by this procedure, click Yes to
continue.
|
Manually replicating a
public folder is similar to the previous procedure. In step 1,
right-click the public folder and then click Send Contents. Steps 2 and 3
are the same.
Public Folder Referrals
When a user connects to a
public folder store and the store does not contain a copy of the content
the user is requesting, Exchange Server 2003 automatically redirects
the user to a server that does contain the content. This occurs behind
the scenes with no intervention required by the user and is known as a
referral. In the default configuration, Exchange Server 2003 will
attempt to refer the user to another server within the routing group and
then use the routing group structure to go to a server in another
routing group, if necessary. Exchange Server 2003 allows you to
configure specific servers to which referrals are allowed and to assign
costs to each server in order to prioritize the list of referral
servers. To customize the list of referral servers, perform the
following steps:
1. | Right-click the desired server in Exchange System Manager and click Properties.
|
2. | Click the Public Folder Referrals tab, shown in Figure 8.
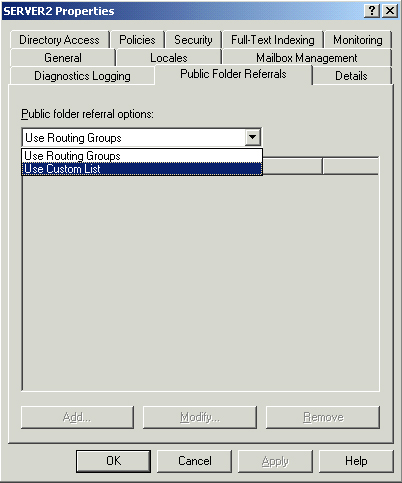
|
3. | The
default setting is to use routing groups. Click the drop-down list
under Public Folder Referral Options, and click Use Custom List.
|
4. | Click
Add and then select the servers you want to configure as referral
servers. Click OK when done, and then click OK again to save the new
configuration. |